Showing posts with label Signature Collection Sara Davies. Show all posts

Monday, 14 January 2019

Oh lala - Parisian Collection

Hi, Crafty Friends 💖
Hope you are well and happy. Today's project's a beautiful stepper card created with the stunning Parisian Collection. The newest launch from the Sara Signature Collection. These amazing group of goodies have everything to create the most lovely cards with an elegant Parisian look. Hope you like it as much as I do!

To create this card you will need:

Centura Pearl Snow White
Black Centura Pearl
Centura Pearl Pastels
Black Mat Card
Metal Die - Vive la France
Metal Die - Roseraie
Metal Die - Floral Borders and Corners
Stamp and Die - French Sayings
Sara Signature Parisian - 8 x 8 Paper Pad
Versamark Ink Pad
Distress Ink Wild Honey
Gems
White Feathers
Pastels Chalks 
Collall Glue
Craft Essentials


Use the borders onto the side panels.

Add Colour to the flower by applying distress ink.


Thanks for stopping by 💖 Happy crafting!

Tuesday, 17 July 2018

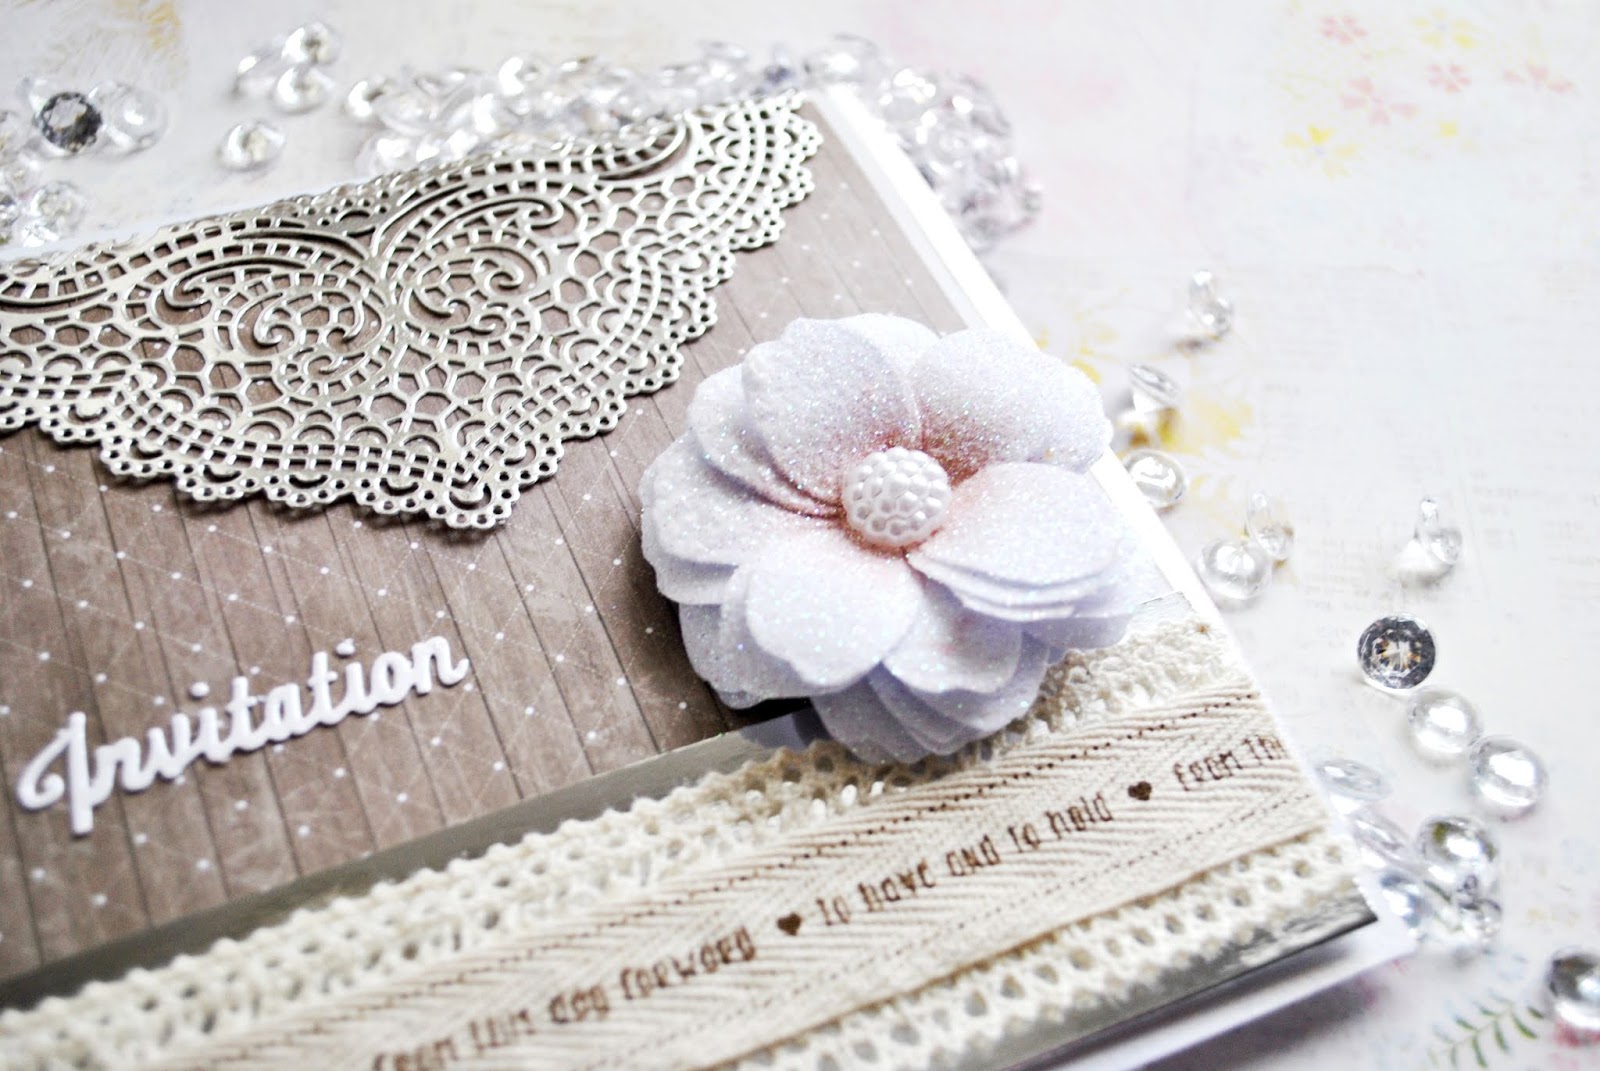
Rustic Wedding- Invitation 💕

Hello Crafty friends!

Hope you are Ok. Today's project's a stunning wedding invitation created with the amazing collection Rustic Wedding by Crafter's Companion. 💕

It is fully coordinating range that includes lace, twine, ribbon, metal charms, rub-ons, hessian, buttons, embossing folders, dies, stamps and a paper pads. Perfect for extra-special occasions from weddings and christenings to milestone birthdays and beyond, this collection will definitely add a rustic touch to your projects with its truly intricate theme.

Hope you like it ! 💖


Ten Fold Invitation

You will need:


16x16 blank
Centura Pearl Snow White
Silver Mirri Card
Metal Die - J'Adore
Sara Signature Rustic Wedding Paper Pad
Bridal Bouquet Die
Rustic Wedding - Bridal Lace
Sara Signature Cotton Ribbon
Crafter’s Companion Quilling Paper Strips
Quilling Tool
Die'sire only words "Invitation" Die
Iridescent Clear Glitter
Half Pearl
Crafter’s Companion Spray and Stay glue
Collall Glue
Gems

Step by Step.

1. Use a sheet of pattern paper from the paper pad and cut it down to 14.5 x 14.5. Affix onto a piece of Centura Pear of 15 x 15 cm. Attach to the blank.

2. Create a die cut with the J'Adore die out of Silver Mirri Card. Use the Spray and Stay glue on the back of the die cut and attach to the top of the card as shown.

3. Cut a 4.5 x 15.5 cm piece of Mirri card. Attach the wider Bride lace along the piece and add a cotton ribbon over the top. Attach this piece to the bottom of the card as shown.

4. Use the Bridal Bouquet Flower Petal die to cut out two strips from the white Quilling paper. Apply distress ink onto the Distress Ink Old Paper with the blending tool to the base of the petals blending towards the tip of the petals. Apply red liner tape across the base. Using a Quilling tool, roll up the petals to form a flower. Curve the petals downwards to give it a natural appearance. Place the flower on a scrap paper and spray it with the Spray and Stay glue. Apply the Clear iridescent glitter over the flower. Tap the flower a few times to discard the excess glitter. Attach the flower to the left as shown.

5. Die cut the word invitation out of Centura Pearl and affix to the left of the card as shown to finish.

Thanks for stopping by 💕 Happy crafting ! xx


Tuesday, 10 April 2018

Rustic Wedding - Easel

Hi Crafty friends!

Hope you are fine. Today I have a brand new collection to show you! Rustic Wedding from Sara Signature Collection has everything you can hope for. Papers Pads, cardstock, buttons, ribbons, twine, rub on transfers, stamps, embossing folders, dies and more!
Here is a beautiful card using some of their items. Hope you like it 💖

List of Materials:
Centura Pearl Snow White
Sheena Stamping Card
Just Married Die
Bridal Bouquet Flower die
Die'sire Classiques Ribbon Threading Dies - Olivia
Cotton Ribbon Pack
Always & Forever Stamps
Stazone Jet Black Ink Pad
A4 Printed Card Kraft Pack
Distress Ink Picked Rasberry
Light pink Ribbon
Collall Glue
Half Pearl
Spray and Stay Glue
Iridescent Clear glitter


Thanks for stopping by  💖Happy Crafting !

Thursday, 11 January 2018

Butterfly birthday

Hello Crafty Friends

Hope you are happy and fine. Today project is a side fold card I created by using the beautiful Flutterby Collection. I keep the card simple because the diecuts are delicate and beautiful.

You will Need:
Blank  12 x 18 cm
Crafter's Companion Flutterby Arrangement of Butterflies  Die
Crafter's Companion Flutterby  Adornments Die
Crafter's Companion Flutterby  Simplistic Sentiments Die
Sheena  White Stamping Card
Crafter's Companion Luxury Cardstock Pack - Gold
Collal Tacky Glue
Golden Gems
Craft Essentials

Step by Step
1.  Cut a piece of 11x17 cm out of gold metallic cardstock.  Attach to the blank.

2. Cut a piece of 10x16 cm out of Sheena Stamping card. Emboss half of the piece  diagonally  with the Scattered in the Winds embossing folder.  Die cut the piece diagonally with the Arrangement of Butterflies. Run the blade of your scissors to the borders to give it a distress look. Layer the piece to the blank as shown.

3. Die cut the sentiment with the Simplistic Sentiments out of glitter golden cardstock. Secure the sentiment in the left top corner.

4. Die cut the butterfly  with the Simplistic Sentiments die out of the  golden cardstock. Attach to butterfly  to the right bottom  corner.

5. Die cut the flourish corner  with the Adornments die out of gold glitter cardstock.  Stick the flourish  to the right top corner. Finally, add the gems  to the centre of the flowers.


Thanks for stopping by  💖Happy Crafting !

Tuesday, 9 January 2018

Flutterby Collection

Hello Crafty Friends

Hope you are fine 💖 a while ago I did  a few tutorials for a magazine with the new awesome Collection Flutterby from Crafter's Companion and I loved it 💖 The collection is one of the most amazing bunch of crafty goodies from CC !

Here is the first of the cards I made. Hope you like it 😉


You will need:

Blank  21x15 cm
Crafter's Companion Flutterby  embossing folder Scattered in the Wind
Crafter's Companion Flutterby metallic cardstock
Crafter's Companion Flutterby Stamp and Die Set Frame Wings
Crafter's Companion Flutterby die Simplistic Sentiments
Sheena  White Stamping Card
Distress Inks  Shaded Lilac and Peacock Feathers
Spectrum Noir Watercolour pens
Spectrum Noir Clear Sparkle pen
Stazone Ink Jet Black
Dabber
Collal Tacky Glue
Purple gems
Pink Ribbon
Craft Essentials

Step by Step

1- Stamp  the butterfly in a piece of white Sheena Stamping Card with Stazone Ink. Colour the butterfly with the Spectrum Noir Watercolour pens (Magenta, Rose Pink,  wildflower)and when it dries apply the Sparkle pen all over the image and cut around it.

2. Cut a piece of Sheena stamping card of 19 x 13 cm and apply the distress ink slightly starting from the centre. Apply  the distress ink Lilac to the borders  spreading  the ink towards the centre and let it dry. Emboss this piece with the Scattered in the Wind embossing folder.  Run the blade of the scissor across the borders to give it a distressed look.  Glue the ribbon in the middle of the card. Attach to the blank. Affix the butterfly in the right bottom corner and add the gems to the corners.


3. Finally, die cut the sentiment from the  metallic  purple cardstock and stick it to the left top corner as shown.

Thanks so much for stopping by  💖 Happy Crafting !


Thursday, 11 May 2017

Little Box of Surprises

Hello Crafty friends!

Hope you are well  💖Today's project is a little box made with the fantastic goodies from the Shabby Chic Collection by Crafter's Companion. This little bow if perfect to be used as party favour or a gift box. Hope you like it 💖

You will need:

-Shabby Chic Paper Pad
-Centura Pearl Snow White
-Clear acetate
-Chic Butterflies Die
-Distress Ink Pink Raspberry
-Weathered Window Die
-Collal Glue


Thanks for stopping by 💖

Friday, 24 March 2017

Wish, Hope, Love 🌺

Happy Friday crafty friends !

Hope you are fine 💖 Today project's a fab floral card made with the amazing goodies from the Shabby Chic Collection which I adore. It's versatile  and stunning 😍  Other perfect card for Mother's Day.  Hope you like it !


For make this card you will need:
-Shabby Chic Paper pad 6"x6"
-Centura Pearl Snow White
-Cherished Memories die and stamp set
-Ball embossing tool
-Black inkpad
-Ornamental Border embossing folder
 -Versamark ink Pad
-White embossing powder
-White printing paper
-Aged Rose die
-Roll up Flower die -Sara Signature Collection
-Flowers for all Occasions 4 Die -Die'sire
-Spectrum Noir Clear Sparkle Pen
-Spectrum Noir Markers Light pink and Blue
-Weathered Window die
-Printed wooden Buttons
-Collal Glue

-Twine
-Craft essentials


Step by Step

1. Create a 15cm square white card blank with the fold at the side.

2.Cut a 14cm square of floral/ old written  effect paper from the Shabby Chic Paper pad. Run the blade of your scissors down the edges of the paper  few times to distress the borders. Cut a rectangle of 14cmx10cm  from the distress rose effect paper and die cut the larger borders with the  Antique Edge die. Distress the borders with Pink Raspberry distress ink  and mount it onto the background  vertically. Wrap a piece of lace around the panel securing the ends behind. Fix across the card front  as shown.

3.Die cut the Classic Lily petals twice in the pink  Core'dinations cardstock. Die cut the stamen  in Centura pearl.  Shape the petals with a ball embossing tool. Glue the flower offsetting  the petals. Glue the stamen to the centre of the  flower.  Place the flower  on a piece of scrap paper and spray it with Stick and Spray Adhesive. Cover the flower with glitter and discard the excess. Stick the flower in the front of the card as shown.
4.-Die cut two Filigree Flourish in Centura Pearl card and add under the  flower's petals as shown.
5. Die cut a medium  Chic Butterfly  in Centura Pearl card. Glue 3 white half pearls in the butterfly's body and secure the butterfly to the upper left corner.
6. Stamp and die cut the sentiment from the Cherished Memories die and stamp Set onto the Centura Pearl card and add the sentiment in the bottom right corner to finish.


Products used:


Thursday, 23 March 2017

Cherished Memories

Hello Friends !

Hope you are well and happy  💖Today's project is a beautiful ten fold card made with the stunning collection Shabby Chic by Crafter's Companion. Perfect for Mother's day

You will need:
-Shabby Chic Paper pad 6"x6"
-Centura Pearl Snow White
-Cherished Memories die and stamp set
-Ball embossing tool
-Black inkpad
-Craft box basics
-Antique Edge die
-Mixed Ribbon Pack  by Sara Signature Together Forever Collection
-Classic Lily die
-Stick and Spray Adhesive
-Core' dinations  cardstock -Pastels
-Ball embossing tool
-Rainbow White Iridescent Glitter  by Stix2
-Filigree Flourish die
-Chic Butterflies die
-White Half pearls
-Pink Raspberry Distress Ink

Step by Step

1. Create a 15cm square white card blank with the fold at the side.

2.Cut a 14cm square of floral/ old written  effect paper from the Shabby Chic Paper pad. Run the blade of your scissors down the edges of the paper  few times to distress the borders. Cut a rectangle of 14cmx10cm  from the distress rose effect paper and die cut the larger borders with the  Antique Edge die. Distress the borders with Pink Raspberry distress ink  and mount it onto the background  vertically. Wrap a piece of lace around the panel securing the ends behind. Fix across the card front  as shown.

3.Die cut the Classic Lily petals twice in the pink  Core'dinations cardstock. Die cut the stamen  in Centura pearl.  Shape the petals with a ball embossing tool. Glue the flower offsetting  the petals. Glue the stamen to the centre of the  flower.  Place the flower  on a piece of scrap paper and spray it with Stick and Spray Adhesive. Cover the flower with glitter and discard the excess. Stick the flower in the front of the card as shown.
4.-Die cut two Filigree Flourish in Centura Pearl card and add under the  flower's petals as shown.
5. Die cut a medium  Chic Butterfly  in Centura Pearl card. Glue 3 white half pearls in the butterfly's body and secure the butterfly to the upper left corner.
6. Stamp and die cut the sentiment from the Cherished Memories die and stamp Set onto the Centura Pearl card and add the sentiment in the bottom right corner to finish.


Products Used:
Chic Butterflies
  Thanks for stopping by 💖

Tuesday, 21 March 2017

Blue Love

Hello Crafters !

Hope you are fine 💖 Today's project is a beautiful floral card made with the awesome Collection Shabby Chic from Crafters Companion.

Hope you like it as much as I do !

You will need:
-Filigree Flourish die
-Weathered Window die
-Distress Lattice  Embossing Folder                  
-Aged Rose die
-Roll up Flower die -Sara Signature Collection
-Flowers for all Occasions 4 Die - Die'sire
-Peacock Feathers  Distress ink
-White printing paper
-Studio Acrylics White Gesso by Pebeo
-White Mini roses
-Spectrum Noir Clear Sparkle Pen
-Shabby Chic Paper pad 6"x6"
-Centura Pearl Snow White
-Cherished Memories die and stamp set
-Ball embossing tool
-Black inkpad
-Craft box basics

Step by Step


1.- Create a 17.5cm square white card blank with the fold at the side.

2. Cut a 15cm square of floral blue-rose paper from the Shabby Chic Paper pad. Run the blade of your scissors down the edges of the paper few times to distress the borders and mount onto Centura Pearl card leaving a narrow border. Fix to the front of the card blank.

3.- Cut a piece of floral blue/rose paper from Shabby Chic paper pad of 14cm square and emboss it by using the Lattice embossing folder. Put a little bit of white gesso on your finger and rub it in the embossed pattern. Run the blade of your scissors down the edges of the paper few times to distress the borders . Fix the piece tilted in the front of the card.

4.-Die cut the Window in Centura Pearl card. Glue it to the top right corner.

5.- Use the flowers dies to create different types/sizes of flowers in white printing paper and light blue cardstock from the Core'dinations cardstock -Pastels. Use the ball embossing tool to shape the petals. Add some shimmer with the Spectrum Noir Sparkle pen. Glue all the flowers as shown in the picture.

6.- Die cut the Filigree Flourish in Centura Pearl card and add under the floral display on the top and bottom.

7. Stamp the sentiment from Cherished Memories die and stamp set onto Centura Pearl card and die cut it with the small banner . Die cut the large banner in the floral pattern paper and add the sentiment in the bottom right corner to finish.


Products Used:
Weathered Window


Thanks for stopping by 💖 Creative Blessings ..